Monday, April 22, 2013

Oatmeal Banana Muffins


I can't take credit for the creation of the recipe but I have to share it and my changes because it is very yummy!  I first found this recipe here, she found the recipe here, and she found the recipe here.  If you click through all of them, you can see the different variations that other people have come with.  My version most closely resembles the first recipe that I found.

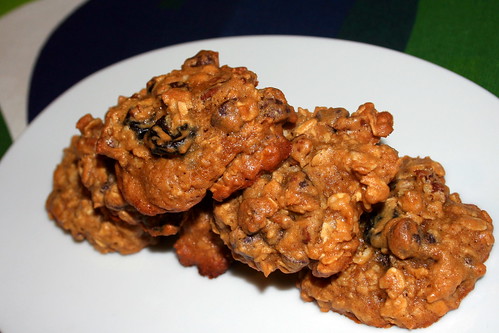
The picture is not great but the difference in coloring is the difference between a silicon pan (lighter muffin) and a regular pan (darker muffin).

These are not overly sweet and I felt like they are packed with great nutrients to get your self going in the morning.  There is no added fat or added sugar.  Yes, there is honey but I consider that to be a good sugar not a processed sugar.  I don't know all the rules and guidelines for paleo diets and gluten free diets but I think they are pretty close or could be slightly adapted.

And just another quick note, I loaded this recipe into my calorie counting app.  The nutrition facts at the bottom reflect a yield of 15 muffins.


Oatmeal Banana Muffins
yields 12-15 muffins

Ingredients:
2.5 cups old-fashioned oats
1 cup non-fat vanilla greek yogurt
2 eggs
6 Tablespoons honey
2 teaspoons baking powder
1 teaspoon baking soda
1 teaspoon cinnamon
2 Tablespoons flax seed
1 teaspoon vanilla
2 ripe bananas

Instructions:

Preheat oven to 350 degrees.  Spray muffin pan with coconut oil.

Using a food processor, pulse oatmeal for 10-15 seconds.  Add remaining ingredients and pulse until mixed together and smooth.

Divide batter into muffin pan.  Bake for 18-20 minutes.

Cool slightly and enjoy warm! 

Nuturtion Facts:
Calories - 114
Fat - 2g
Cholesterol - 25mg
Sodium - 17mg
Potassium - 117mg
Carbs - 21g
Fiber - 2g
Sugar - 10g
Protein - 4g

Tuesday, November 9, 2010

TWD: Not-Just-For-Thanksgiving Cranberry Shortbread Cake


If you think the title of this recipe is a mouthful, wait till you bake this delicious dessert! The recipe itself is very simple, a shortbread dough divided into a top layer and a bottom layer. The in between layer is a cranberry orange jam filling.

I was a bit hesitant to bake these up. I don't really know why other than trying to be careful of baking too many sweets and life just keeping me busy. When I looked over the recipe, I realized it was very simple. So simple, all I had to do was make the dough.

You see, last summer, my grandma taught me how to can. I went a little obsessive and canned everything I could think of, especially jams. Jam is one of the simplest things to can. I'm sure you can see where this is going. I didn't realize last summer, how long it would take 2 people to eat through everything that I had canned, especially the jam. We have definitely found some creative ways and fun ways to eat jam. One of my husband's favorites was the cranberry orange jam that I came up with.

The bottom line, the cranberry orange jam that I created last summer was almost the same as the one Dorie uses as the filling in this cookie! I was so excited to have another way to use up the jam on my pantry shelf. This recipe was so simple and so delicious. The best part is the versatility of this recipe. You can fill it with whatever sweet, fruity, jam type filling you can think of!


Our hostess this week was Jessica of A Singleton in the Kitchen. The recipe can be found on her blog.

Tuesday, November 2, 2010

TWD: Peanuttiest Blondies


This week's recipe was sure to be a huge hit with my husband. He loves all things peanut butter. Growing up we rarely had chunky peanut butter. I'm sure there was a reason but we were a smooth household.

When I got married, my husband requested chunky peanut butter. Ok, by me but I found I still prefer smooth. Nevertheless when I look at this recipe I knew he would love it...and he did! I wasn't the biggest fan. For some reason the combination of chunky peanut butter, salted peanuts and the sweet bite of a chocolate chip did just not appeal to me this week. I suppose you can't win them all.

Thank you to our hostess, Nicole from Bakeologie. The recipe can be found on her blog.

Tuesday, October 26, 2010

TWD: All-American, All-Delicious Apple Pie


I could say something about my absence the last several months but I'm sure I probably don't have any readers left. I'm sure you all have busy lives and don't want to hear about mine. Life happens.

While life is happening, sometimes I am baking and sometimes I am not. For the things have made and not blogged about, I am planning to post. I find the hardest part is not finding the time to bake but finding the time and words in which to blog. I am not a writer, never have been and never will be and most days I don't have any interesting stories. But, I do love baking!

I recently got the chance to meet Dorie Greenspan, the author of this amazing book we are baking through and without whom, this group wouldn't exist. She was even more wonderful in person than I imagined her to be. What struck me as the most inspirational that night was when she said that Baking: From My Home to Yours and Around My French Table are what she considers to be her autobiographies. I am going to remind myself of her dedication every time I want to be a slacker.

That said, I have actually made this pie 3 times! The first pie, seen below, I made with apples from last year. I had peeled, cored, sliced and frozen them and needed to clear them out of my freezer. I made it for the first day of school for the teachers my husband works with. They all loved it. I was not impressed. The problem was with the apples, they tasted fine but had a mushy texture that I did not enjoy. Two days later, my husband came home and said one of his fellow teachers had dreamed about my pie.

The second time, I made the pie, I forgot to take a picture. I am so disappointed because in my opinion, it came out the best. One of the most beautiful apple pies, I've ever seen. I took the pie to the cast party for my husband's show. Again, I received rave reviews. Not only did I not get a picture, I never even got a bite. They inhaled it.

The third time, pictured at the top, I made as a thank you gift. The reviews were just as amazing as the first 2 pies. She has also requested more baked goods as soon as possible.

In the end, I only got a sliver of the first pie, which I didn't like! But The reviews speak for themselves, the pie is amazing!


The only change I really made was that I used flour as the thickener instead of tapioca. I didn't have tapioca and the flour substitute turned out great.

Thank you to our hostess this week, Emily of Sandmuffin. The recipe can be found on her blog.

Tuesday, April 27, 2010

TWD: Chockablock Cookies


Molasses, Oats, Cherries, Chocolate, Pecans, Coconut...Oh My!

Yes, folks, that is a lot of ingredients to pack into one little cookie. But let me tell you they are delicious.

Dorie's recipe uses a combination of both butter and shortening, I decided to take the lazy way out and just used all butter. She also gives a lot of room for creativity in this recipe. You can use any combination of nuts and dried fruit you would like. I opted for using dried cherries and pecans in additional to the oats, coconut and chocolate chips that were already part of the recipe. I loved the flavors together. They all complimented each other really well. The cookies were sticky in texture from the molasses and the the dough had a strong molasses flavor but in the end I didn't really notice a molasses flavor at all.

Thank you to Mary of Popsicles and Sandy Feet. You can find the recipe on her blog.

Tuesday, April 20, 2010

TWD: Sweet Cream Biscuits


I bring FABULOUS news! As of yesterday afternoon, my oven has been fixed. Since only the glass shattered, they were able to just replace the glass (and my landlords don't have to buy me a new stove). Putting the door back on proved to be quite a challenge for both our handyman and my husband who was helping. Apparently we have an older stove and the door is heavy and the hinges are old so the heavy door on the old hinges was a bad combination. But after a few adjustments, I am back in business!

Since, my oven wasn't finally repaired until yesterday afternoon and last week was so successful, I decided to go back to my trusty toaster oven this past weekend. We had a house guest on Saturday morning so I decided to whip up a batch of biscuits for our brunch. And when I say whip up, I mean it! A few dry ingredients, pour in some cream and roll out the biscuits. These were so much easier than using a pastry cutter to cut cold butter into flour.


First Batch, 1/2" thickness

I followed Dorie's instructions and roll them to 1/2" thickness. I used a square cookie cutter and got about 10 biscuits. They didn't rise as much as I wanted them to but they weren't flat hockey pucks either. While the first batch was cooking (I could only fit 4 on my toaster oven stoneware pan) I went to the P&Q for this week and found many people mentioning Alton Brown's instructions to be very helpful. I hadn't seen the episode and couldn't find it online so I read the instructions of his recipe hoping for a couple hints. He mentions placing the biscuits close together on the baking sheet. Of course, I thought this way odd. When I make cookies, I always space them out for spreading. I decided to give it a try. When the second batch of biscuits went into the toaster oven, I placed them close together, expecting them not to rise very much since these were also the biscuits I rolled out second so they were worked a little more. And to my surprise, they rose! They didn't rise a ton but again I didn't have flat hockey pucks.


Second Batch, 1" thickness

I sent the extra biscuits from brunch home with our friend. And later that night I remembered I had bought strawberries that were on sale and had wanted to have strawberry shortcakes. Since the biscuits whip so fast and I still had 1 cup left of heavy cream. I decided to make another batch.

I had also noticed in Alton Brown's instructions that he said to only roll out to 1" thickness to prevent from overworking the dough. Since we were having strawberry shortcakes I thought thicker biscuits would be better. I only got a total of 7 out of the second recipe but the rose very nicely.

I know the key to making biscuits is not the overwork the dough and I definitely saw a difference. These were delicious and easy and will most likely be my go to recipe for biscuits.

Our hostess this week was Melissa of Love At First Bite. You will find the recipe on her blog.

Tuesday, April 13, 2010

TWD: Swedish Visiting Cake


If you read last week's post about my oven. You heard my tale of woes. I won't bore you again with the details except to tell you I want to bake in the worst way. As luck would have it (and with my strong desire to bake) the buzz about this cake all week on Twitter and our P&Q was that this cake was easy and fabulous. I was disappointed to say the least.

When I opened my Google reader this morning it was filled with posts about the Swedish Visiting Cake and how wonderful and easy it was to make. One of the first ones I read was my friend Clara, IHeartFood4Thought. Even though being sick she was able to whip up a few MINI Swedish Visiting TARTS! And the light bulb went off. My toaster oven has a bake setting. Certainly my cast iron skillet wouldn't fit inside (actually, its home is on top!) but I could fit a mini tart pan in my toaster oven!


To say I was determined was an understatement. I went to work thinking about nothing except my plan. I couldn't wait to get home. And as luck would have that, I had a very short day at the account closest to my house.

I think this may be my most memorable TWD, The One With the Toaster Oven! And of course my friends on twitter did not disappoint. This cake was super easy to whip up. To quote our hostess this week, "If you can stir with a spoon, you've got this cake made."

Our hostess this week is Nancy of The Dogs Eat the Crumbs. You can find the full recipe on her blog. Thanks, Nancy, for a great selection to help me find the motivation I needed this week!

Edit: I was so excited to post this and tell everyone about my great experience I left out a few details. I made a 1/2 recipe and got 3 4.5" tarts. On the bake setting on my toaster oven I still baked them at 350 but only for 20 minutes since they were mini. And if you are on the fence at all about making this let me just tell you from start to finish, including taking pictures and writing this post, I think I used a total of an hour and a half of my day. And it tastes fantastic!

Tuesday, April 6, 2010

TWD: Dulce de Leche Duos


If you came looking for a Coconut Tea Cake; you unfortunately will not find one here. I had a minor mishap last week and am without an oven...Until Further Notice! What is a girl to do?? Don't the oven gods know I have baking to do! I am may be alone in this fact but once I am told I can't do something it only makes me want to do it more. I want to bake something in the worst way and not even because I am craving a sweet but just because I want to bake.

However, even though I am disappointed that I don't have an oven. I will not disappoint my fellow TWD bakers and readers. I have a few recipes that I made and for some reason or another never got around to posting. I will post those until I have a new oven or a new glass door or whatever it is that my landlords replace my mishap with.

These sweet cookies were our TWD recipe a couple weeks ago. I took the advice of several TWD bakers and made the dulce de leche in the crock pot method overnight. I was pleased with the results however, I think it could have cooked a bit longer. It didn't come out in a dark caramel color. It was a bit lighter and to me still tasted like sweetened condensed milk. I loved the cookies by themselves. I ate several before I wrapped them up and froze them in order to save my waistline! Adding the extra dulce de leche in the middle to make a sandwich is still gooey and sugary and yummy but I love a good plain cookie.

Our host was Jodie of Beansy Loves Cake and the recipe can be found here. For tips on making your own dulce de leche you can see our TWD discussion here and here.


PS. If your heart was set on a Coconut Tea Cake head over to see Carmen of Carmen Cooks for the recipe!

Tuesday, March 30, 2010

TWD: Mocha-Walnut Marbled Bundt Cake


As you can see this is not a bundt cake. I don't have a full size bundt cake pan and didn't feel like dealing with the tiny ones I have that never come clean. My solution was to make half the recipe and I put it in my loaf pan!

The other big change I made was substituting the walnuts. I already had ground up almonds in my cupboard so I took the easy route. I have been having a bit of a hard time getting my Dorie recipes made every week because if it says in the house, I eat it and well...that hasn't really been a good problem to have. I am also really good at making new new things and not sitting down and blogging them. I'll never make it as a professional blogger that's for sure!

Never the less, I made this week easy on myself. I used my loaf pan and almonds. I thought it came out great. The two pieces you see cut in the picture are all the were consumed in this house; one for me and one for my husband. (I have to at least taste test it right?!) I then wrapped it right up and put in the freezer. I'm planning to mail it to my brother in college.

This week's host was Erin of When In Doubt...Leave It At 350. You can find the recipe on her blog.

PS. If you came look for a Coconut Tea Cake, come back next week. We had the option of choosing either with the Easter holiday coming up.